
HeyPenny Platform Guide
Leader Demo:
Step-by-step demo walk-through of logging a conversation, viewing team data and viewing prior conversations
How to log in
There are two ways to log in to HeyPenny:
Single Sign-On (SSO) – uses your organisation’s Microsoft or Google account.
Magic Link – we email you a special link you click to log in (no password needed).
Follow the steps below depending on which method you use.
Option 1: Logging in with Single Sign-On (SSO)
Go to your HeyPenny log in link.
Click Log in with SSO.
Choose your sign-in provider: Microsoft or Google.
Type your work email address (not a personal one) and click Next.
Enter your password for Microsoft/Google.
If your organisation uses two-step verification, follow the on-screen steps.
When finished, you’ll be taken straight into HeyPenny.
If you don’t see ‘Log in with SSO’ or a Microsoft or Google icon/button, your organisation may not have SSO turned on. Use the magic Link steps below or ask your internal admin.
Option 2: Logging in with a Magic Link
Go to your HeyPenny log in link.
Enter your work email address in the login field.
Click Send.
Open your email inbox. Look for a new email from HeyPenny (check Spam/Junk if you can’t see it).
Open the email and click the Log in button (or the link in the email).
A new browser tab will open and log you straight into HeyPenny.
Important: Magic links expire after a short time and are for you only. If it expires, just request a new one.
Troubleshooting
No email arrived? Wait 2–3 minutes, check Spam/Junk, and confirm you typed the correct work email. Then try Send me a magic link again.
Wrong account? If SSO keeps showing your personal account, click Use another account and enter your work email.
Stuck on a blank or error page? Refresh the page, or close the tab and try again from app.heypenny.co.nz.
Two-step verification problems? Use your usual method (authenticator app, text code) or contact your IT team.
Still can’t log in? Contact your organisation’s HeyPenny admin or HeyPenny Support for help.
How to complete your personal profile
Setting up your profile helps your organisation know who you are and makes sure your information is up to date.
Follow these steps:
Click the Profile icon in the main menu at the top of the page (see example below).
Click the purple “Edit” button to the right of your name.
A pop-up info box will appear. Fill in all the fields (such as your name, role, contact details).
When you’re finished, click Save at the bottom of the box.
That’s it, your profile is complete!

Profile icon is selected and showing in green.

Purple Edit button is seen to the right of your name.
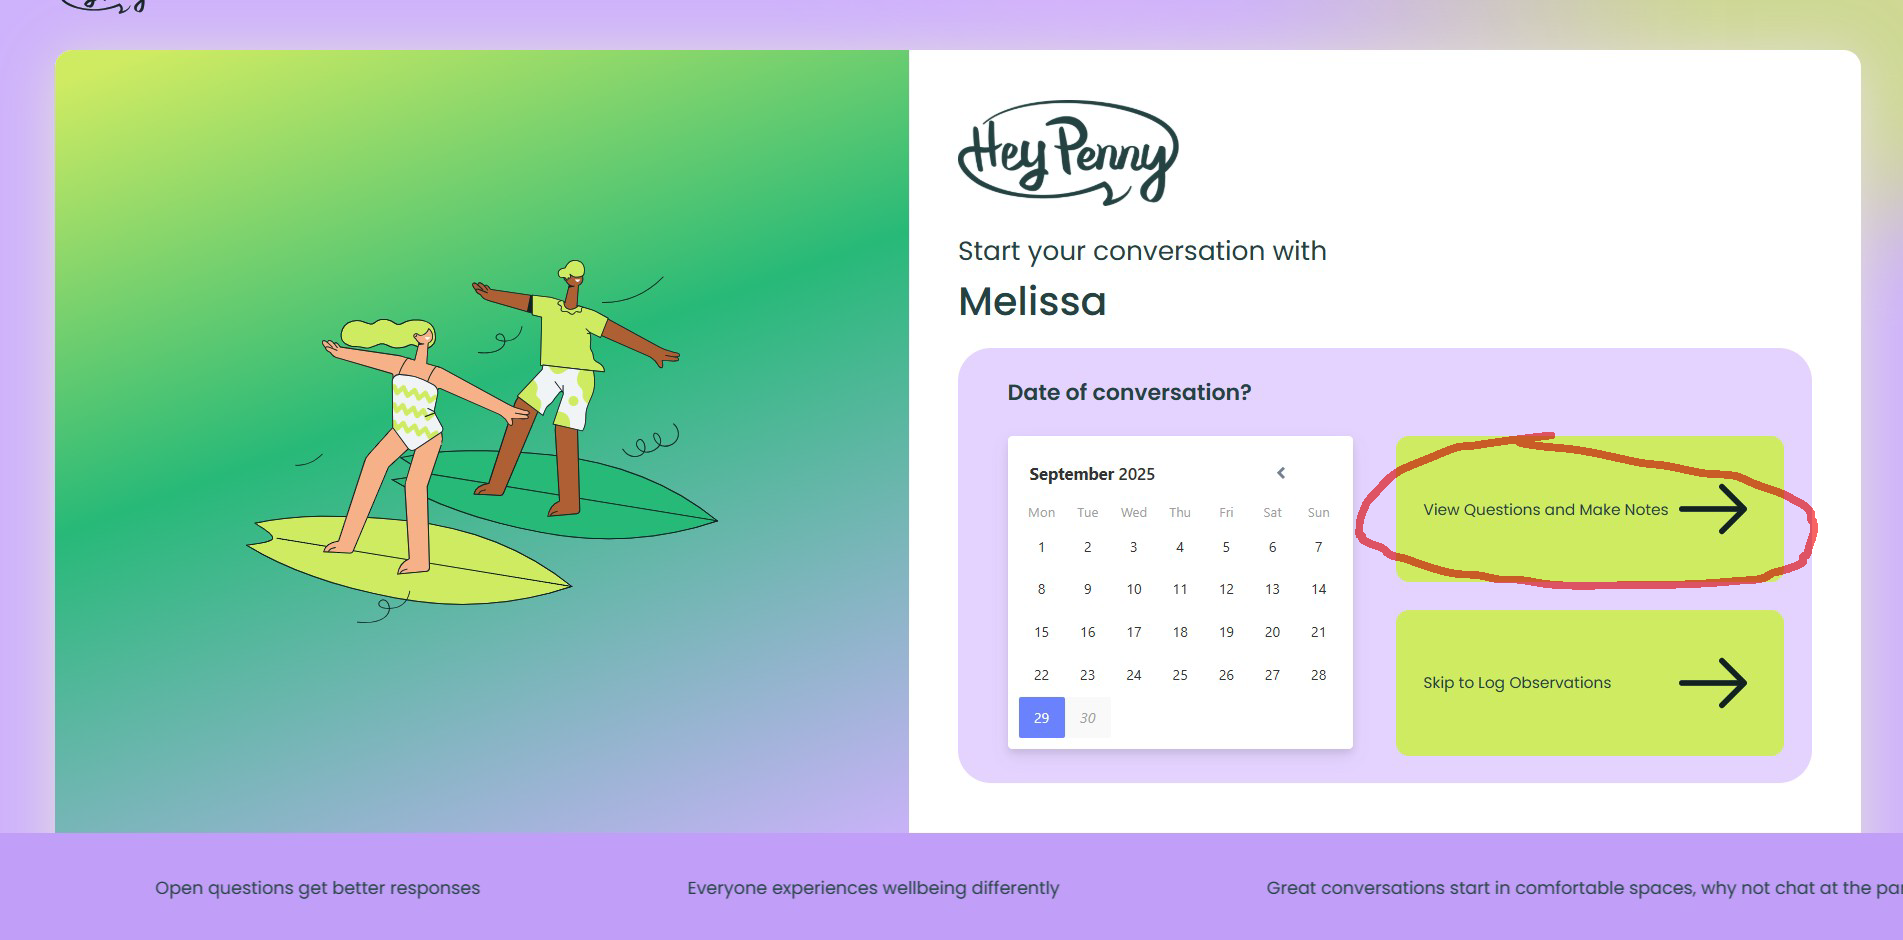
How to prepare for a check-in conversation
Preparing for a 1:1 check-in helps you feel confident and comfortable going into the conversation. It gives you clear direction on what to ask, plus helpful prompting questions to use.
Step-by-step
Click the dark purple button in the top right-hand corner of the screen.
In the prepare box, click the green “Prepare” button at the bottom right.
Find the person you’d like to prepare for, then click the green arrow to the right of their name.
On the left-hand side box, choose one of the categories.
Look at the list of factors in that category:
If you’d like to discuss one, read the prompt question on the right.
Click the plus button (+) to save that question.
Want a different question? Click the refresh circle to see a new one.
Repeat this for the other three categories.
If you already have specific questions in mind, type them into the notes section on the right-hand side.
When you’re finished, click the “I’m prepped” button at the bottom right to save your work.
From here you can continue through to Chat or Log, or exit back to the home page.
———————
Note: At the bottom of the screen, you’ll see a rainbow-coloured slider.
The left (red) side represents “struggling.”
The right (green) side represents “thriving.”
Move the slider based on how you think your team member’s wellbeing is at the moment. The questions will automatically adjust depending on where you place it.
How to use HeyPenny Scribe
Leaders can transcribe check-in conversations directly into the platform, making workflows easier, faster, and more secure than ever.
Quick overview
Start a conversation and navigate to the ‘View Questions and Make Notes’ screen.
Click Scribe to start transcribing your conversation. You can pause and resume the Scribe at any point.
Once your conversation is finished, click Stop.
Please leave your browser open while the transcription processes.
Once processed, the text will appear in your notes screen. Leaders have full flexibility to review and alter the text if desired.
From there, seamlessly move through to logging your observations and generating insights.
Step-by-step
Start a conversation and navigate to the ‘View Questions and Make Notes’ screen.
Click Scribe to start transcribing your conversation. You can pause and resume the Scribe at any point.
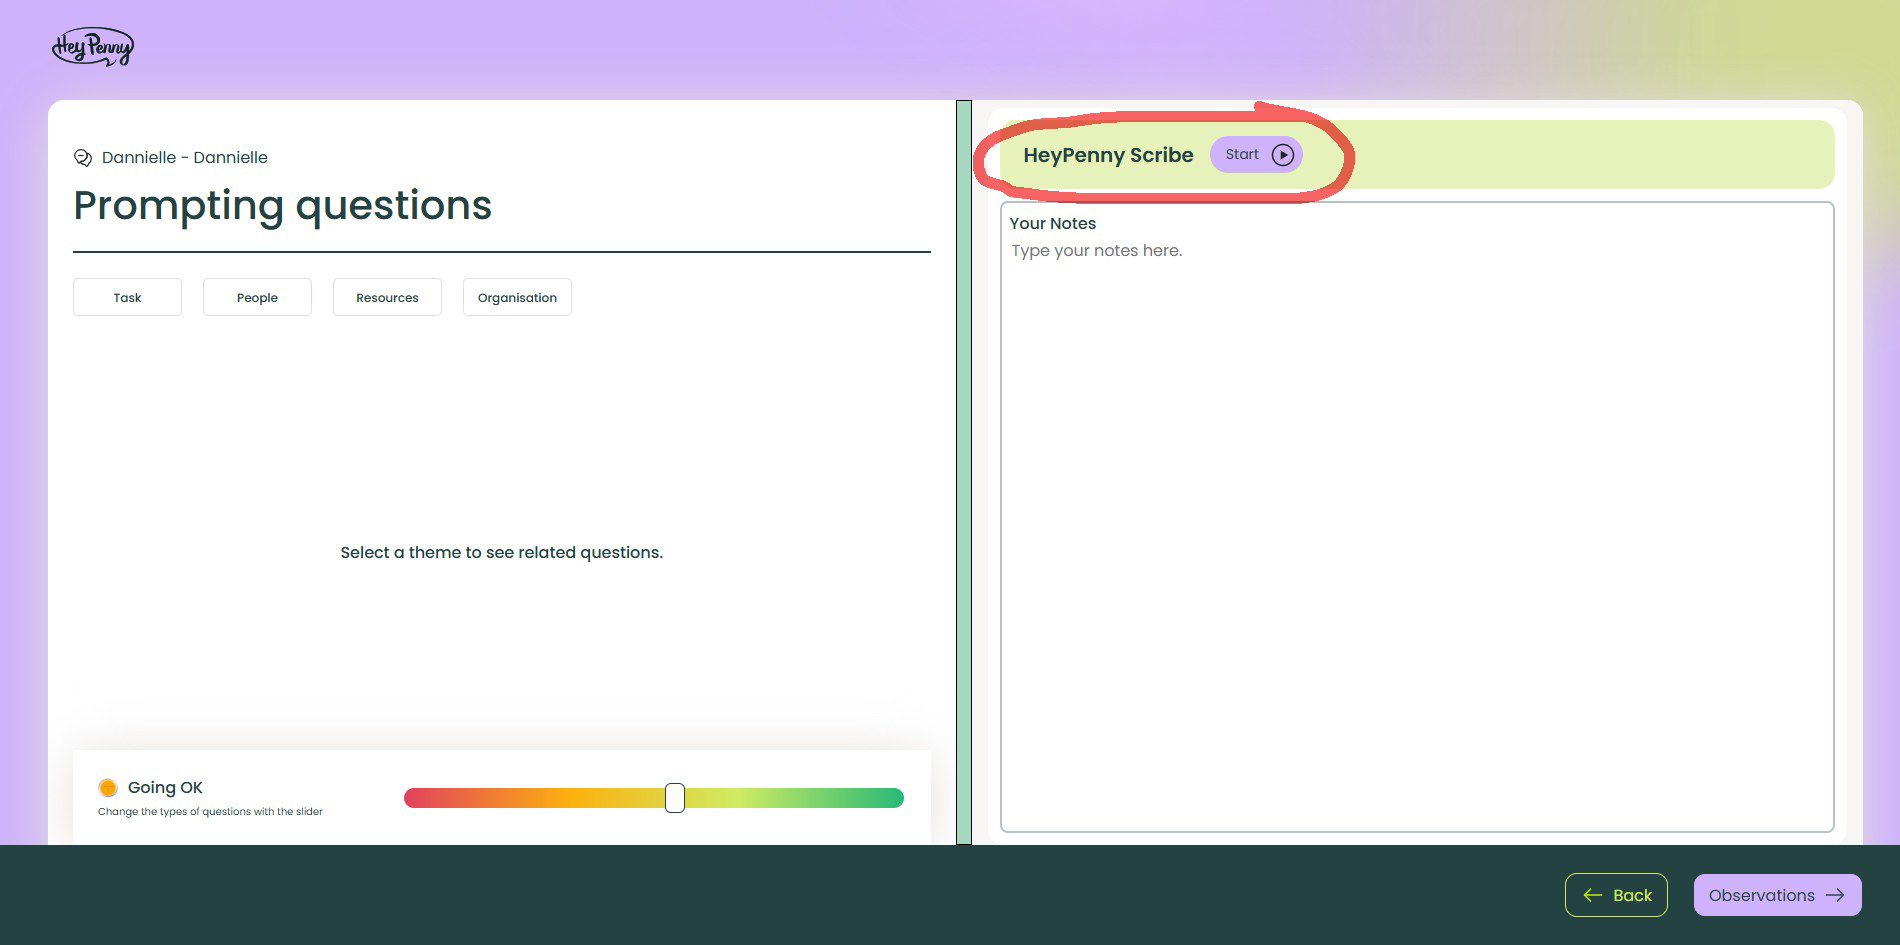
Once your conversation is finished, click Stop.
Please leave your browser open while the transcription processes.
Once processed, the text will appear in your notes screen. Leaders have full flexibility to review and alter the text if desired.
From there, seamlessly move through to logging your observations and generating insights.
How to log a conversation using our AI Agent
HeyPenny’s AI Agent helps you capture insights from your 1:1 conversations quickly and accurately. Here’s how to use it:
Step-by-step
Click the dark purple button in the top right-hand corner of the screen.
Find the person you are logging the conversation for and click the arrow to the right of their name.
Enter your meeting notes into the Notes box on the right.
You can type them in directly.
Or copy and paste in your notes or a conversation transcript.
When finished, click the green Generate button above the notes box.
This activates the AI Agent, which analyses your notes and creates insights.
Review the insights. Adjust the Factor Classification or edit the text if needed.
Once you’re happy, click Save at the bottom right.
You’ll return to the main Log screen, where you can review or add extra insights.
When finished, click Go to Resources in the bottom right-hand corner.
You’ll now be on the Follow-Up Email screen.
To customise the draft email based on your notes and insights, click the green Draft button above the email box on the right.
On the left, you’ll see suggested resources based on the insights. To add one, click the Add button next to the resource name. This will attach it to the follow-up email.
When everything is ready, click Send Follow-Up Email in the bottom right-hand corner.
Note: Once you click Send Follow-Up Email, all observations are saved, and all notes or transcripts are deleted from the system as part of HeyPenny’s privacy and security policy.
How to review, accept and decline observations
After a check-in conversation, insights are generated and saved by the leader. These insights are then shared with the employee who took part in the check-in, giving both people a chance to review and confirm them.
This process helps make sure all insights are accurate, fair, and reflect what was actually discussed in the conversation.
For Leaders
After you complete a check-in and save the insights, a follow-up email is automatically sent to the employee.
The employee will review the insights and has the option to accept, decline, or comment on them.
Once the employee completes their review, you’ll receive a notification that their review is ready.
Open the insights to see their responses.
If everything was accepted, no further action is needed.
If an insight was declined or commented on, you can review their feedback and make any adjustments.
Once changes are made, click Resubmit for Review to send the updated insights back to the employee.
This process can occur up to two times in total. After the second round, the insights will be finalised.
For Employees
Follow these simple steps to review the insights from your check-in:
Go to your Dashboard (home screen after you log in).
Click the Conversations in progress tab (centre-left of the page).
Find your conversation and click the green Review button.
For each insight:
Click the green thumbs-up to Accept, or
Click the red thumbs-down to Decline.
If you decline an insight, a comment box will appear so you can explain what needs changing.
If you have any overall thoughts, type them in the Leave a comment box at the bottom of the page.
When you’re finished, click Complete (bottom right).
What happens next: your leader is notified of your review. If you declined anything or added comments, they can make changes and (if needed) send the insights back to you once more for a second review.
How to access and explore resources
HeyPenny includes a resource library that’s available to every user, anytime. It’s there to give you tools, ideas, and explanations to support your conversations and your work.
Follow these steps:
Click the Resources icon in the top main menu bar (as seen below).
Browse through the different factor categories to find what you’re looking for.
Open a category to see resources connected to that area.
In this library, you’ll also find a breakdown of our factor framework along with clear definitions of all the factors.

To select the Resources page, click the resources icon as highlighted in green above
How to access HeyPenny’s factor framework
The Factor Framework can also be found on the Resources page. You can explore this at any time in the resource library.
Follow these steps:
Click the Resources icon in the top main menu bar.
In the resources section, look for the Framework tab.
Click to open it and you’ll see a full breakdown of all the factors, including clear definitions for each one.
To select the Resources page, click the resources icon as highlighted in green above
How to find and view team data
The Data Dashboard gives you a clear picture of what’s happening in your team. It shows which factors are supporting your people and which may be getting in the way, so you can respond with confidence.
Follow these steps:
Click the Data icon in the main menu at the top of the page (as seen below).
The Data Dashboard will open. Here you’ll see:
An overview of each category and factor, showing which ones are protecting your people and which are harming them.
A breakdown of the number of observations recorded against each factor, and whether they were protective, neutral, or harmful.
An overview of resource send rates and usage, so you can see how often resources are being shared and opened.

To access the Data page, select the data icon as highlighted in green above.
How to edit observations
If you need to make a change to an observation that’s already been logged, follow these steps:
Go to your Data Dashboard.
Scroll down to the section called Observations – Qualitative.
Find the category that the observation sits under and click to expand it.
Next, expand the factor that the observation is linked to.
Locate the observation you want to change and click the grey Edit button to the right of it.
Make your changes in the text box.
When you’re done, click Save.
Your updated observation will now appear in the system.
How to add a timeline marker or measure
Timeline markers and measures help you track important moments and see how changes impact your team over time.
Follow these steps:
Click the Settings icon (the cog) in the top menu.
Find the row for either Marker or Measure (depending on what you’d like to add).
Click the Add button next to that row.
Fill in all the information.
When you’re finished, click Save at the bottom left.